What Part L Photographic Evidence Do Builders Need to Collect on Site?
The insulation is in. The walls are ready to close. The plasterboard team is booked. Then someone asks the question that stops the room.
“Have we got the Part L photos?”
That is when a simple task can become a real site problem.
For new build homes, Part L photographic evidence is not something to leave until handover. Many of the details that matter are hidden by the time the project reaches completion. Floor insulation, cavity closers, service penetrations, air sealing, roof insulation and ventilation duct routes can all disappear behind finishes.
Once they are covered, the evidence is much harder to collect.
This guide explains what Part L photographic evidence builders should collect on site, why it matters, and how a missed photo can create avoidable delays near completion.
Approved Document L Volume 1 for dwellings says photographic evidence should be provided for each individual dwelling, taken at appropriate construction stages, and captured before close up works. It also links photographic evidence with the Building Regulations England Part L report, often known as the BREL report.
What is Part L photographic evidence?
Part L photographic evidence is a set of site photos that help show how key energy related details have been built.
For new dwellings, these photos support the wider Part L evidence process. They help the project team, SAP assessor and building control body understand what has been installed and whether the as built information matches the design intent.
SAP is the Standard Assessment Procedure used to calculate the energy performance of homes. GOV.UK describes SAP as the method used to calculate a home’s energy performance, and the current GOV.UK SAP page was updated in May 2025.
The photos do not replace SAP calculations. They do not replace air testing. They do not guarantee building control acceptance.
They are part of the evidence trail.
A good Part L photo helps answer a simple question:
Can the project team clearly show what was installed before it was covered?
Why Part L photographic evidence matters
On site, most Part L problems do not start with one dramatic failure. They usually start with small gaps.
A window specification changes, but the SAP assessor is not told.
A cavity closer detail is installed correctly, but nobody photographs it.
A duct route is boxed in before the ventilation evidence is captured.
A plant label is hidden behind a cupboard door.
A subcontractor takes photos, but they stay on a phone.
Each issue can feel small at the time. Together, they can create a final stage scramble.
Approved Document L states that the as built BREL report should be signed by the SAP assessor to confirm that the as built calculations are accurate and that documentary evidence and photographs have been reviewed. It also says the developer should sign the as built BREL report to confirm the dwelling has been completed according to the specifications in the report.
That makes the photo record important. If the evidence is missing, unclear or mixed across plots, the final review can take longer than it needs to.
When should builders take Part L photos?
The short answer is before the detail is covered.
The better answer is at the point where the detail is complete, visible and easy to identify.
Do not wait for practical completion. By then, many of the details that matter will be hidden behind plasterboard, flooring, boxing, cupboards, loft boarding or external finishes.
A good site rule is this:
If the detail affects heat loss, air leakage, ventilation, heating, hot water or SAP inputs, photograph it before it disappears.
The timing matters as much as the photo itself. A photo taken too early may show incomplete work. A photo taken too late may not show the detail at all.
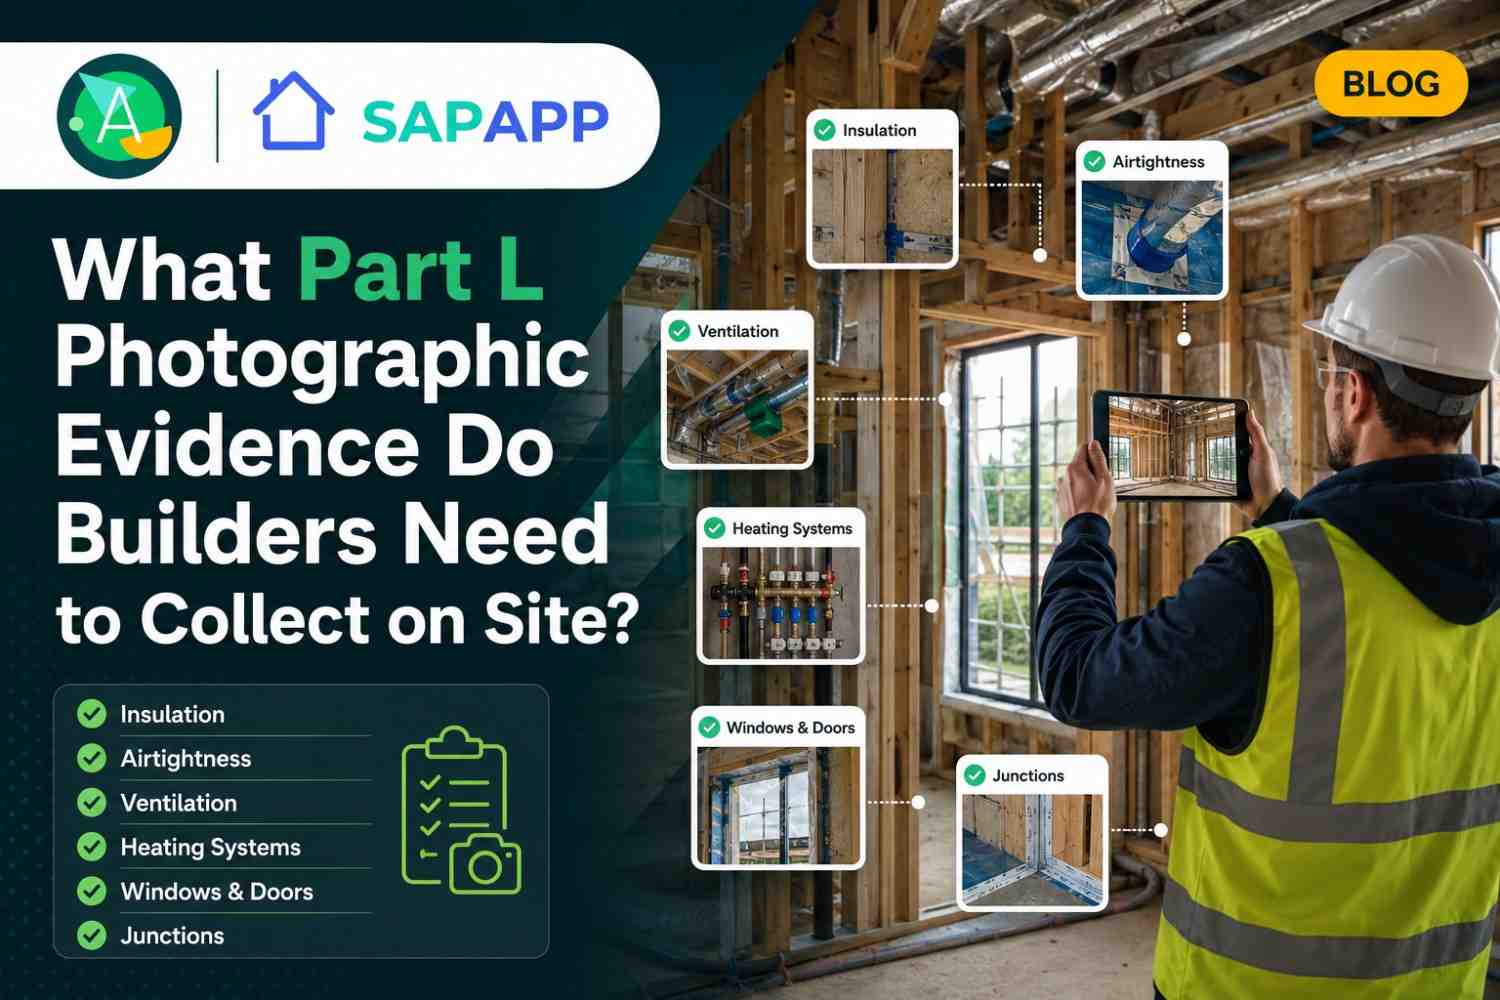
What Part L photographic evidence should builders collect?
The exact evidence should always match the project, specification and dwelling type. However, most new build housing projects should be capturing the following areas.
Foundations, floors and floor insulation
Photograph the floor build up before it is covered.
Useful photos include:
• Ground floor insulation before screed or boarding
• Floor perimeter insulation
• Insulation around service penetrations
• Junctions between floor and external wall
• Continuity of insulation at thresholds
• Any proprietary insulated foundation or floor edge details
These photos are important because floor junctions can have a real impact on heat loss and thermal bridging. Once the floor is finished, it is very hard to prove what was installed.
External walls and insulation
External wall evidence should show the insulation type, location and continuity.
Capture:
• Cavity insulation or frame insulation
• Full fill or partial fill cavity details
• Insulation around openings
• Insulation continuity at corners
• Wall ties and cavity trays where relevant
• Junctions with floors, roofs and party walls
• Any areas where insulation has been cut around services
Close up photos can be useful, but they should not be the only image. Take a wider photo as well so the location is clear.
Windows, doors and reveals
Openings are common weak points for heat loss and air leakage.
Photograph:
• Window and door frames before final finishes
• Cavity closers
• Insulated reveals
• Sill details
• Head and jamb details
• External door thresholds
• Airtightness tapes or sealant where used
• Labels or evidence linked to window and door specification
The photo should clearly show the plot and location. A close up of a reveal with no context may not be enough later.
Roof insulation and loft areas
Roof and loft evidence often gets missed because the site team assumes it will be easy to see later. That is not always true.
Capture:
• Loft insulation depth
• Insulation continuity at eaves
• Sloping ceiling insulation
• Dormer insulation where relevant
• Roof junctions
• Loft hatch insulation and sealing
• Service penetrations through ceilings
• Any areas around ducts, pipes or downlights
For loft insulation, include something that makes the depth clear, such as a visible gauge or reference point where appropriate.
Thermal bridges and junctions
Thermal bridges occur where heat can bypass insulation more easily, often at junctions.
Photograph typical details such as:
• External wall to ground floor junctions
• External wall to roof junctions
• Corners
• Window and door openings
• Party wall junctions
• Balcony or canopy connections where relevant
• Steel penetrations or structural elements affecting insulation continuity
If the SAP calculation uses specific thermal bridging assumptions, the photo evidence should help support the details used.
Air barrier and sealing details
Air leakage can affect performance and air test results.
Before details are covered, photograph:
• Service penetrations through the external envelope
• Sealing around pipes and cables
• Duct penetrations
• Loft hatches
• External door thresholds
• Window perimeter sealing
• Meter boxes
• Soil pipe boxing
• Utility penetrations
• Fire collars and sealing where relevant
These photos also help the site team prepare for air testing. They do not replace the air test, but they can help identify weak points before the test date.
Heating and hot water systems
Part L evidence is not only about insulation. Services matter too.
Photograph:
• Boiler, heat pump or heating appliance labels
• Hot water cylinder model labels
• Controls
• Cylinder insulation
• Pipe insulation
• Commissioning records where available
• Plant cupboard layout
• Manufacturer details and model references
The SAP assessor needs accurate information on the installed system. If the product on site is different from the design assumption, it should be checked.
Ventilation systems
Ventilation evidence is often left too late, especially where ducts are boxed in.
Capture:
• Ventilation unit labels
• Duct routes before boxing
• Insulated ducts where required
• External terminals
• Room terminals
• Extract fan details
• Commissioning information
• Controls
Part L and Part F often interact on real projects. Poor coordination between ventilation, airtightness and SAP evidence can create avoidable queries.
Solar PV and low carbon technology
Where PV or other low carbon systems are included in the SAP design, collect evidence of what has been installed.
Photograph:
• PV panels on the roof
• Inverter
• Metering equipment
• Layout compared with the design
• Labels and model references
• Battery storage where included
• Electrical records where relevant
If PV output is part of the SAP strategy, the installed system should match the information used in the assessment.
What makes a good Part L evidence photo?
A useful photo is not just a close up of a product.
A good Part L evidence photo should show:
• The plot number
• The room or location
• The detail being recorded
• Enough wider context to identify where it is
• The completed detail before it is covered
• Clear product labels where relevant
• The date, either through file data or site records
The best approach is often two photos.
First, take a wider context photo showing the plot and location.
Then take a close up showing the technical detail.
This gives the assessor and project team a much better evidence record.
Common mistakes builders make with Part L photographic evidence
Taking photos too late
This is the biggest issue. Once the detail is hidden, the evidence may be lost.
Taking photos with no plot reference
A good photo becomes much weaker if nobody knows which dwelling it belongs to.
Only taking close ups
A close up can show detail, but it may not prove location. Always include context.
Mixing photos across plots
Repeated house types still need plot specific evidence. Do not assume one plot photo covers all plots.
Not linking photos to SAP changes
If the installed product changes, the SAP information may need updating. Photos should support the as built record.
Leaving evidence on phones
Site photos need to be stored in a shared, structured place. A phone gallery is not an evidence system.
How missed evidence can delay completion
Missed evidence can create delays because the project team may need to:
• Revisit plots
• Ask trades for old photos
• Check hidden details
• Confirm product specifications
• Update SAP inputs
• Respond to assessor queries
• Provide clearer evidence to the building control body
Not every missing photo causes a delay. But missing evidence often creates uncertainty, and uncertainty creates extra work at the worst time.
By handover, the site team is already busy with finishing, testing, snagging, client inspections and completion paperwork. That is not the time to start building a photo record from scratch.
How SAPAPP helps builders organise Part L evidence
SAPAPP gives builders a practical way to capture and manage Part L photographic evidence while the job is live.
Instead of scattered photos, SAPAPP helps organise evidence by:
• Plot
• Detail type
• Construction stage
• Evidence status
• Missing items
• Product information
• SAP related changes
• Final evidence pack
This helps the site team see what has been captured and what still needs action.
It also helps managers and assessors work from clearer information. The aim is simple. Capture the evidence once, in the right place, before it is too late.
What information does ATSPACE need from you?
To help set up a Part L evidence process, ATSPACE would usually ask for:
• Latest drawings
• SAP design information
• Specification documents
• Window and door schedules
• Heating and hot water details
• Ventilation strategy
• Plot schedule
• Construction programme
• Any existing site photos
• Details of product substitutions
If some information is missing, that does not mean the process cannot start. It simply means the gaps need to be visible and managed.
What builders receive at the end
A good Part L evidence process should leave the builder with:
• Organised plot records
• Clear photographic evidence
• Missing evidence tracker
• Product evidence checklist
• SAP change notes
• Air test preparation evidence where relevant
• Final evidence folder structure
• Fewer last minute information requests
The goal is not paperwork for the sake of paperwork. The goal is a clear, usable record that supports the final SAP and Part L process.
Why ATSPACE
ATSPACE works with builders who need practical compliance support, not vague advice.
We understand that sites move quickly. We also understand that evidence must match the real build, not just the design drawing.
With SAPAPP, we help builders capture the right photos, organise them properly and keep the evidence aligned with SAP inputs and Part L requirements.
We do not promise approval or guaranteed outcomes. We do provide structured, evidence led support that helps reduce avoidable risk before completion.
FAQ
Is Part L photographic evidence required for every new dwelling?
Approved Document L says photographic evidence should be provided for each individual dwelling and should be unique to that property.
Who should take the Part L photos?
The photos can be taken by the site team, builder, developer or others involved in the project. The important point is that they are clear, traceable and available to the relevant parties.
Do Part L photos replace SAP calculations?
No. Photos support the evidence trail. SAP calculations are still required where applicable, and SAP remains the method used to calculate the energy performance of homes.
When is the best time to take Part L photos?
Take photos when each detail is complete but before close up works. This is especially important for insulation, junctions, service penetrations and duct routes.
What happens if we miss a photo?
It depends on the detail and the project stage. A missed photo may lead to extra queries, a site review or further evidence checks. The best approach is to identify missing evidence early.
Do repeated house types need separate photos?
Yes. Evidence should be collected for each individual dwelling. Repeated details can help with consistency, but each plot still needs its own record.
Can SAPAPP help if we are already near handover?
Yes. SAPAPP can still help organise existing photos, identify gaps and create a clearer evidence pack. However, it works best when used before key details are covered.
Does organised photographic evidence guarantee Part L compliance?
No. Organised evidence does not guarantee compliance or building control acceptance. It helps the project team provide clearer records and reduce avoidable information gaps.
Call to action
Part L photographic evidence is easiest to collect when the work is still visible.
If your site is approaching close up, air testing or final SAP review, speak to ATSPACE now. We can help you set up SAPAPP, review your current evidence and give your team a clear route to close out.