The result
A multi‑plot apartment build was one test slot away from entering a costly retest cycle. The plots looked finished, but the team suspected hidden leakage risks behind kitchens, risers, ceilings and service routes.
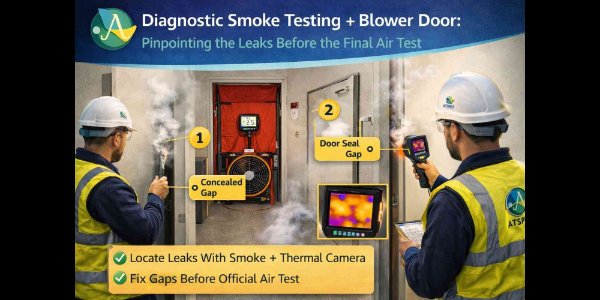
ATSPACE ran diagnostic smoke testing under controlled blower‑door pressure, traced the real air‑movement pathways, and produced a short list of high‑impact fixes the trades could complete the same day.
The final airtightness tests passed cleanly — no panic sealing, no disruption, no retests.
Project snapshot
Service: Diagnostic smoke testing
Client: Main contractor (new build apartments)
Site: Rowan Quay Apartments, 12 Dockside Mews, Bristol BS1 6QR
Building type: 6‑storey residential block (48 flats)
Programme stage: Final week before airtightness testing + compliance submission
Compliance driver: Approved Document Part L
ATSPACE delivery: Blower‑door diagnostic pressure setup, smoke‑pencil tracing, leak‑route ranking, close‑out plan, verification checks, test support
Team: ATSPACE airtightness engineer + compliance coordinator
Why the contractor booked diagnostic smoke testing
On apartment blocks, the real cost is not the test — it’s the fail.
A failed air test can trigger:
- access issues across multiple flats
- riser and ceiling tile reworks
- delays to commissioning
- programme drift while retest slots are booked
- trade disputes over where the leak sits
Workmanship on the project was generally strong, but enough interface risks existed to make a fail realistic.
The contractor wanted certainty before using the final test slot.
What diagnostic smoke testing is in practice
Diagnostic smoke testing makes airflow visible, using controlled pressure to force leaks to reveal themselves.
ATSPACE uses smoke pencils with blower‑door pressure to:
- show where air is actually moving, not where it “looks like” it might be
- trace the path backward through voids and risers
- distinguish small cosmetic gaps from high‑impact routes
- produce a targeted, short fix list instead of a long snagging bundle
With a blower door driving the pressure, smoke testing exposes exactly the leaks that will affect the final test.
The problem on site
The contractor had three recurring concerns:
1. Riser closures not fully sealed
Risers are vertical leakage highways — one small gap repeats across floors.
2. Flat entrances and access panels looked okay, but weren't airtight
Poor closure pressure or inconsistent seals can ruin test results.
3. Late‑stage penetrations and tweaks
Last‑minute M&E changes reopen previously sealed zones.
The key question:
Where are the leaks that will actually cause a fail?
What ATSPACE did on site
Step 1: Confirm the airtightness line
We reviewed the expected airtight layer:
- flat envelope boundaries
- service penetrations
- riser closures
- ceiling interfaces
- door sets and thresholds
- window/balcony junctions
This prevented scatter‑gun snagging.
Step 2: Create controlled pressure with a blower door
Stable pressure made smoke behaviour reliable and repeatable.
Step 3: Smoke trace the highest‑risk zones first
- riser doors + riser head closures
- kitchen + bathroom service penetrations
- ceiling voids near fan coils/duct routes
- flat entrance doors + thresholds
- balcony door frames
- meter and intake service zones
Step 4: Rank findings by impact
We prioritised leaks based on:
- actual airflow under pressure
- whether the issue repeated across flats
- access risk (would it soon be closed off?)
- ease + speed of fix
Step 5: Provide a practical close‑out plan
Each action listed:
- location
- actual air pathway
- fix required
- what “good” looks like
- the trade responsible
Step 6: Verification before the final test
We checked the high‑impact areas post‑remedials so the final test slot was protected.
What we found
Finding 1: Riser door seals not compressing consistently
Why it mattered:
One small riser gap repeated across floors adds major leakage.
Fix:
Adjust closure pressure, ensure continuous seals, close frame‑to‑structure gaps.
Finding 2: Service penetrations behind kitchens
Why it mattered:
Hidden penetrations behind fitted units are high‑impact and hard to access later.
Fix:
Seal as part of the airtight layer and standardise detail across similar flats.
Finding 3: Ceiling void interface at corridor service routes
Why it mattered:
Can create cross‑communication and major leakage under pressure.
Fix:
Reinstate continuity at the ceiling line and close void interfaces.
Finding 4: Entrance door threshold leakage
Why it mattered:
Direct external pathway — small gaps cause measurable leakage.
Fix:
Seal frame + threshold junction and confirm seal compression.
Finding 5: Bathroom boxing edges leaking into voids
Why it mattered:
Boxing hides the gap but doesn’t stop airflow without an airtight layer behind it.
Fix:
Seal the air‑path behind boxing and close out edges properly.
The outcome
The contractor achieved what they needed most: control before the final test.
Site outcomes:
- fewer airtightness snags
- minimal disruption to finishing trades
- consistent results across similar flats
- final tests passed first time
- clean Part L compliance evidence
What this proves
Diagnostic smoke testing works because it reveals connected air paths, not just visible gaps.
On residential blocks, the biggest wins come from:
- riser routes
- service penetrations
- ceiling void connections
- threshold and frame junctions
These are the leaks that actually move test results.
Common mistakes this project avoided
- booking final tests based on appearance rather than evidence
- sealing visible edges while major leaks remain hidden
- leaving risers + door seals until the end
- allowing late penetrations without resealing
- producing long snag lists without prioritisation
CTA
If your final airtightness test is approaching and you want to avoid retests, ATSPACE diagnostic smoke testing with blower‑door pressure will pinpoint the leaks that matter while access is still possible.
Ask for:
- diagnostic smoke testing before airtightness tests
- smoke‑pencil tracing under controlled pressure
- prioritised close‑out plans for rapid fixes
- verification checks to protect your test slot
Frequently asked questions
What is diagnostic smoke testing used for?
To visually trace air‑leak pathways so fixes target the real issues.
Do you need a blower door for smoke testing?
Not always — but controlled pressure makes results far more accurate.
When should testing be done?
Ideally 3–7 days before the final test, while service zones are still accessible.
What are the most common leak routes in apartment blocks?
Risers, service penetrations, ceiling voids, access panels, entrance thresholds and repeated frame junctions.