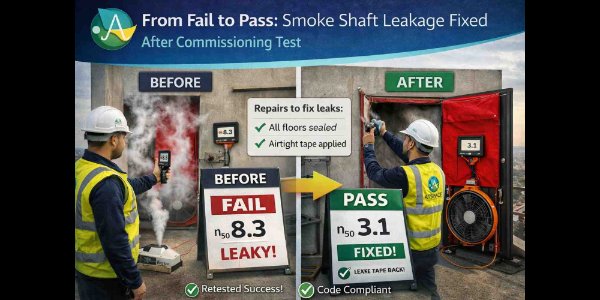
The Result
A residential smoke shaft failed its commissioning leakage test, and initial snagging did not improve the result. ATSPACE was brought in to identify the dominant leakage routes, provide a targeted remedial plan, and protect the retest slot. The shaft passed on retest without weeks of disruption and without random sealing across finished areas.
Project Snapshot
Service: Smoke shaft leakage testing + remedial troubleshooting
Client: Principal contractor + smoke control specialist
Site: Crescent Point, 6 Dockview Road, Cardiff CF10 4BZ
Building type: 9‑storey residential block with corridor + smoke shaft
Smoke control: Shaft with AOV + corridor vents
Programme stage: Post‑fail remedial window
Compliance driver: Part B + fire strategy
ATSPACE delivery: Diagnostic investigation, leak mapping, remedial plan, readiness check, retest support + reporting
Engineers: ATSPACE test engineer + compliance coordinator
What the Failure Was Doing to Programme
Once a smoke shaft fails, the commercial impact is immediate:
- commissioning stalls
- follow‑on sign‑offs are delayed
- remedials require corridor/ceiling access and out‑of‑hours work
- teams start sealing at random
- the retest slot becomes a high‑pressure gamble
The client needed a controlled route from fail → pass, fast.
Why the Initial Snagging Did Not Work
The team initially sealed visible gaps and adjusted door seals.
But the dominant leak routes were:
- access door seals + frame interfaces
- vent frames not sealed continuously
- roof‑level AOV interfaces
- unclosed openings inside the shaft
- repeated leakage at junction lines floor‑to‑floor
These cannot be solved with cosmetic sealing.
What ATSPACE Was Asked To Do
- explain why the shaft failed
- identify dominant leakage routes
- produce a targeted remedial list
- verify readiness before retest
- provide reporting suitable for handover + fire strategy packs
What ATSPACE Did
Step 1: Review the test context
We confirmed how the previous test was configured and what had changed since — retests often fail because the building configuration is inconsistent.
Step 2: Trace leakage under controlled pressure
We traced airflow at:
- shaft access doors
- corridor vent interfaces
- roof‑level AOV interface
- builders‑work openings
- shaft joints and corners
We recorded both location and airflow path.
Step 3: Separate background leakage from dominant routes
Every shaft has background leakage. We focused on the three high‑impact routes that were repeated across floors.
Step 4: Targeted remedial plan
A short, prioritised close‑out list with:
- exact locations
- why each item matters
- what “good” looks like
- clear trade ownership
Step 5: Retest readiness check
We verified all remedials were complete and no new penetrations had appeared.
The Dominant Leakage Routes Identified
Route 1: Access door seals + closure pressure
Several doors had seals present but poor compression.
Why it moved the result:
A poorly seated door behaves like a permanent shaft opening.
Remedial approach:
Confirm full seal continuity, latching, closure pressure, and frame‑to‑structure sealing.
Route 2: Corridor vent frame interface
Vent frames had incomplete sealing to structure.
Why it moved the result:
Small gaps repeated across floors add up quickly.
Remedial approach:
Seal the entire frame perimeter — not just visible edges.
Route 3: Unclosed builders‑work opening
A builders‑work opening still provided a direct leakage path.
Why it moved the result:
One open route can dominate the entire leakage figure.
Remedial approach:
Fully close out the opening and confirm continuity of shaft lining.
Retest Outcome
After targeted remedials and readiness checks:
✅ The smoke shaft passed on retest.
The project gained:
- controlled recovery without scatter‑gun sealing
- reduced corridor disruption
- a clean evidence trail for handover
- repeatable learning for future blocks
What This Proves
When a smoke shaft fails, the fastest route to a pass is not to seal everything — it is to:
- identify dominant leak paths
- fix them properly
- verify readiness before the retest
That is how you avoid wasted time, wasted labour, and wasted retest slots.
Common Mistakes This Project Avoided
- retesting without understanding the real cause
- sealing visible edges while missing frame interfaces
- ignoring access doors as high‑impact components
- overlooking a single unclosed opening
- booking a retest without readiness verification
CTA
If your smoke shaft has failed a leakage test and you need fast recovery, ATSPACE can identify dominant leaks, produce a targeted remedial plan, verify readiness, and support the retest for a clean pass.
Ask for:
- smoke shaft leakage troubleshooting
- targeted remedial plans
- readiness checks before retest
- smoke shaft leakage retesting + reporting
Frequently Asked Questions
Why do smoke shafts fail leakage tests?
Access doors, vent‑frame interfaces, AOV junctions and unclosed openings are most common.
Can results improve without ripping out corridors?
Often yes — if fixes target the dominant leaks.
How do we avoid wasting a retest slot?
Conduct a readiness check before the retest.
Will reporting support handover?
Yes — we provide clear, handover‑ready documentation.