
How Builders Can Reduce Condensation Risk in Roofs: Practical Site Guide & Compliance
The Frosty November Morning Surprise on Site
Picture this for a second. It is twenty past seven on a bitingly cold Tuesday morning in late November on a 16-plot residential site just outside Warwick. The roofing team finished the tiling a couple of weeks back, first-fix trades have just packed up their vans, and the site manager pops up into the loft hatch of Plot 4 with a torch to check the newly laid 400mm mineral wool quilt.
Instead of a bone-dry loft, there are rows of water droplets glistening on the underside of the roofing membrane. Down in the eaves, moisture is dripping straight onto the fresh insulation, leaving damp, dark patches across the plasterboard ceiling below.
The first thought on site is almost always the same: “The roof is leaking.”
The roofing contractor gets called back out to site, ladders go up, slates and ridge tiles get inspected, lead flashings get checked, and everything is completely watertight. No rainwater is getting in from the outside at all. The roof is actually sweating from the inside.
With today’s building standards pushing for airtight, super-insulated homes under Part L, all that moisture from plastering, screeding, and wet trades cannot simply drift away through draughts. When warm, humid indoor air floats up into a freezing cold roof void and hits cold timbers or unventilated felt, it turns straight into water droplets.
Roof moisture is not some mysterious bad luck. It is basic building physics, and with the right design checks, calculated vapour control, and tidy ventilation detailing on site, it can be sorted out before it ever becomes an issue.
Let’s take a look at how to get your roof detailing spot on, stay on the right side of Approved Document C and BS 5250:2021, and keep handovers running smoothly.
What Is Condensation Risk Management (And When Is It Needed)?
In plain speaking, condensation risk management is an engineering calculation that maps out exactly how heat, air, and moisture vapour travel through every single layer of a roof build-up throughout the changing British seasons.
When moisture builds up in a roof, it usually shows up in one of two ways:
- Surface Condensation: This is the moisture you can see with your own eyes. Warm, humid indoor air meets a cold surface—like an uninsulated loft hatch frame or a steel ridge beam—leaving beads of water that quickly turn into unsightly black condensation and mould.
- Interstitial Condensation: This is the hidden troublemaker. Invisible water vapour travels straight through plasterboard, slips past untaped membrane joints, and settles deep inside the timber rafters, structural deck, or insulation battens. Because interstitial condensation happens out of sight, nobody spots it until roof timbers start rotting, metal fixings corrode, and the insulation gets completely soaked.
When Does a Project Need a Formal Assessment?
- Building Control Sign-Off: Proving the roof design satisfies Approved Document C (Moisture) and meets national standard BS 5250:2021 (Management of moisture in buildings).
- Warm Flat Roofs & Inverted Decks: Flat roofs do not have natural cross-ventilation, so getting the vapour control layer right beneath the rigid insulation is vital to stop trapped moisture forming under the waterproof membrane.
- Vaulted & Cathedral Ceilings: Where insulation sits tightly between and under sloping rafters without an open loft space above.
- Insulation Swaps on Site: If the site team swaps out specified mineral wool for rigid foil-faced PIR boards, changes membrane brands, or introduces structural insulated panels (SIPs), your SAP calculations, SBEM calculations, and U-value calculations need a verified assessment to back them up.
- Room-in-Roof & Dormer Extensions: Where warm bedrooms sit directly against cold eaves spaces and dwarf stud walls.
What Information the Technical Team Needs From You
Getting an assessment turned around quickly is straightforward when the roof details are ready. Having these key items to hand keeps everything moving without delays:
- Layer-by-Layer Roof Build-Up: A clear list of every material from the plasterboard ceiling inside right out to the roof tiles, with thicknesses in millimetres (for example: 12.5mm plasterboard, 500-gauge polythene AVCL, 150mm PIR insulation between rafters, 50mm PIR under rafters, type LR breathable underlay, 38x25mm counter-battens, concrete tiles).
- Product Data Sheets: The manufacturer spec sheets for your chosen insulation boards, membranes, and vapour control layers so the declared thermal conductivity (lambda-value) and vapour resistance (Sd-value or mu-value) can be verified.
- Site Postcode & Building Use: The site location (so local rainfall, wind exposure, and winter temperatures are factored in) and what the building is used for (such as private homes, flats, an office, or high-moisture rooms like swimming pools or commercial kitchens).
- Drawings & Details: 1:20 or 1:50 construction section drawings showing eaves details, ridge ventilation paths, and loft access points.
Step-by-Step: How the Assessment Works
- Setting Up the Layers: Every material in the roof is entered into certified software, mapping its exact thickness, thermal conductivity, and vapour resistance.
- Calculating Temperature Drops & Dew Points: Using UK winter design standards, the software calculates how temperature falls across each millimetre of the roof. As air cools towards the outer tiles, its ability to hold moisture drops right along with it.
- Checking Seasonal Moisture (The Glaser Method - BS EN ISO 13788): Month-by-month checks verify whether water vapour will condense at any material junction during winter, and ensure that any minor moisture will dry out fully during warmer spring and summer months.
- Dynamic Hygrothermal Modeling (WUFI - BS EN 15026): For flat roofs, unvented timber cassettes, or zinc roofs, advanced dynamic simulation models real hourly weather data, driving rain, and sunshine effects over several consecutive years.
- Practical Problem Solving: If a detail flags a risk, the technical team does not just send back a failed piece of paper. Practical, buildable solutions are provided—like repositioning the vapour membrane or adding a counter-batten void—so the build stays compliant and easy to put together on site.
Five Classic Roof Mistakes on Site (And How to Dodge Them)
On live jobs across England and Wales, roof moisture troubles almost always come down to small installation slips. Here are five classic pitfalls to steer clear of:
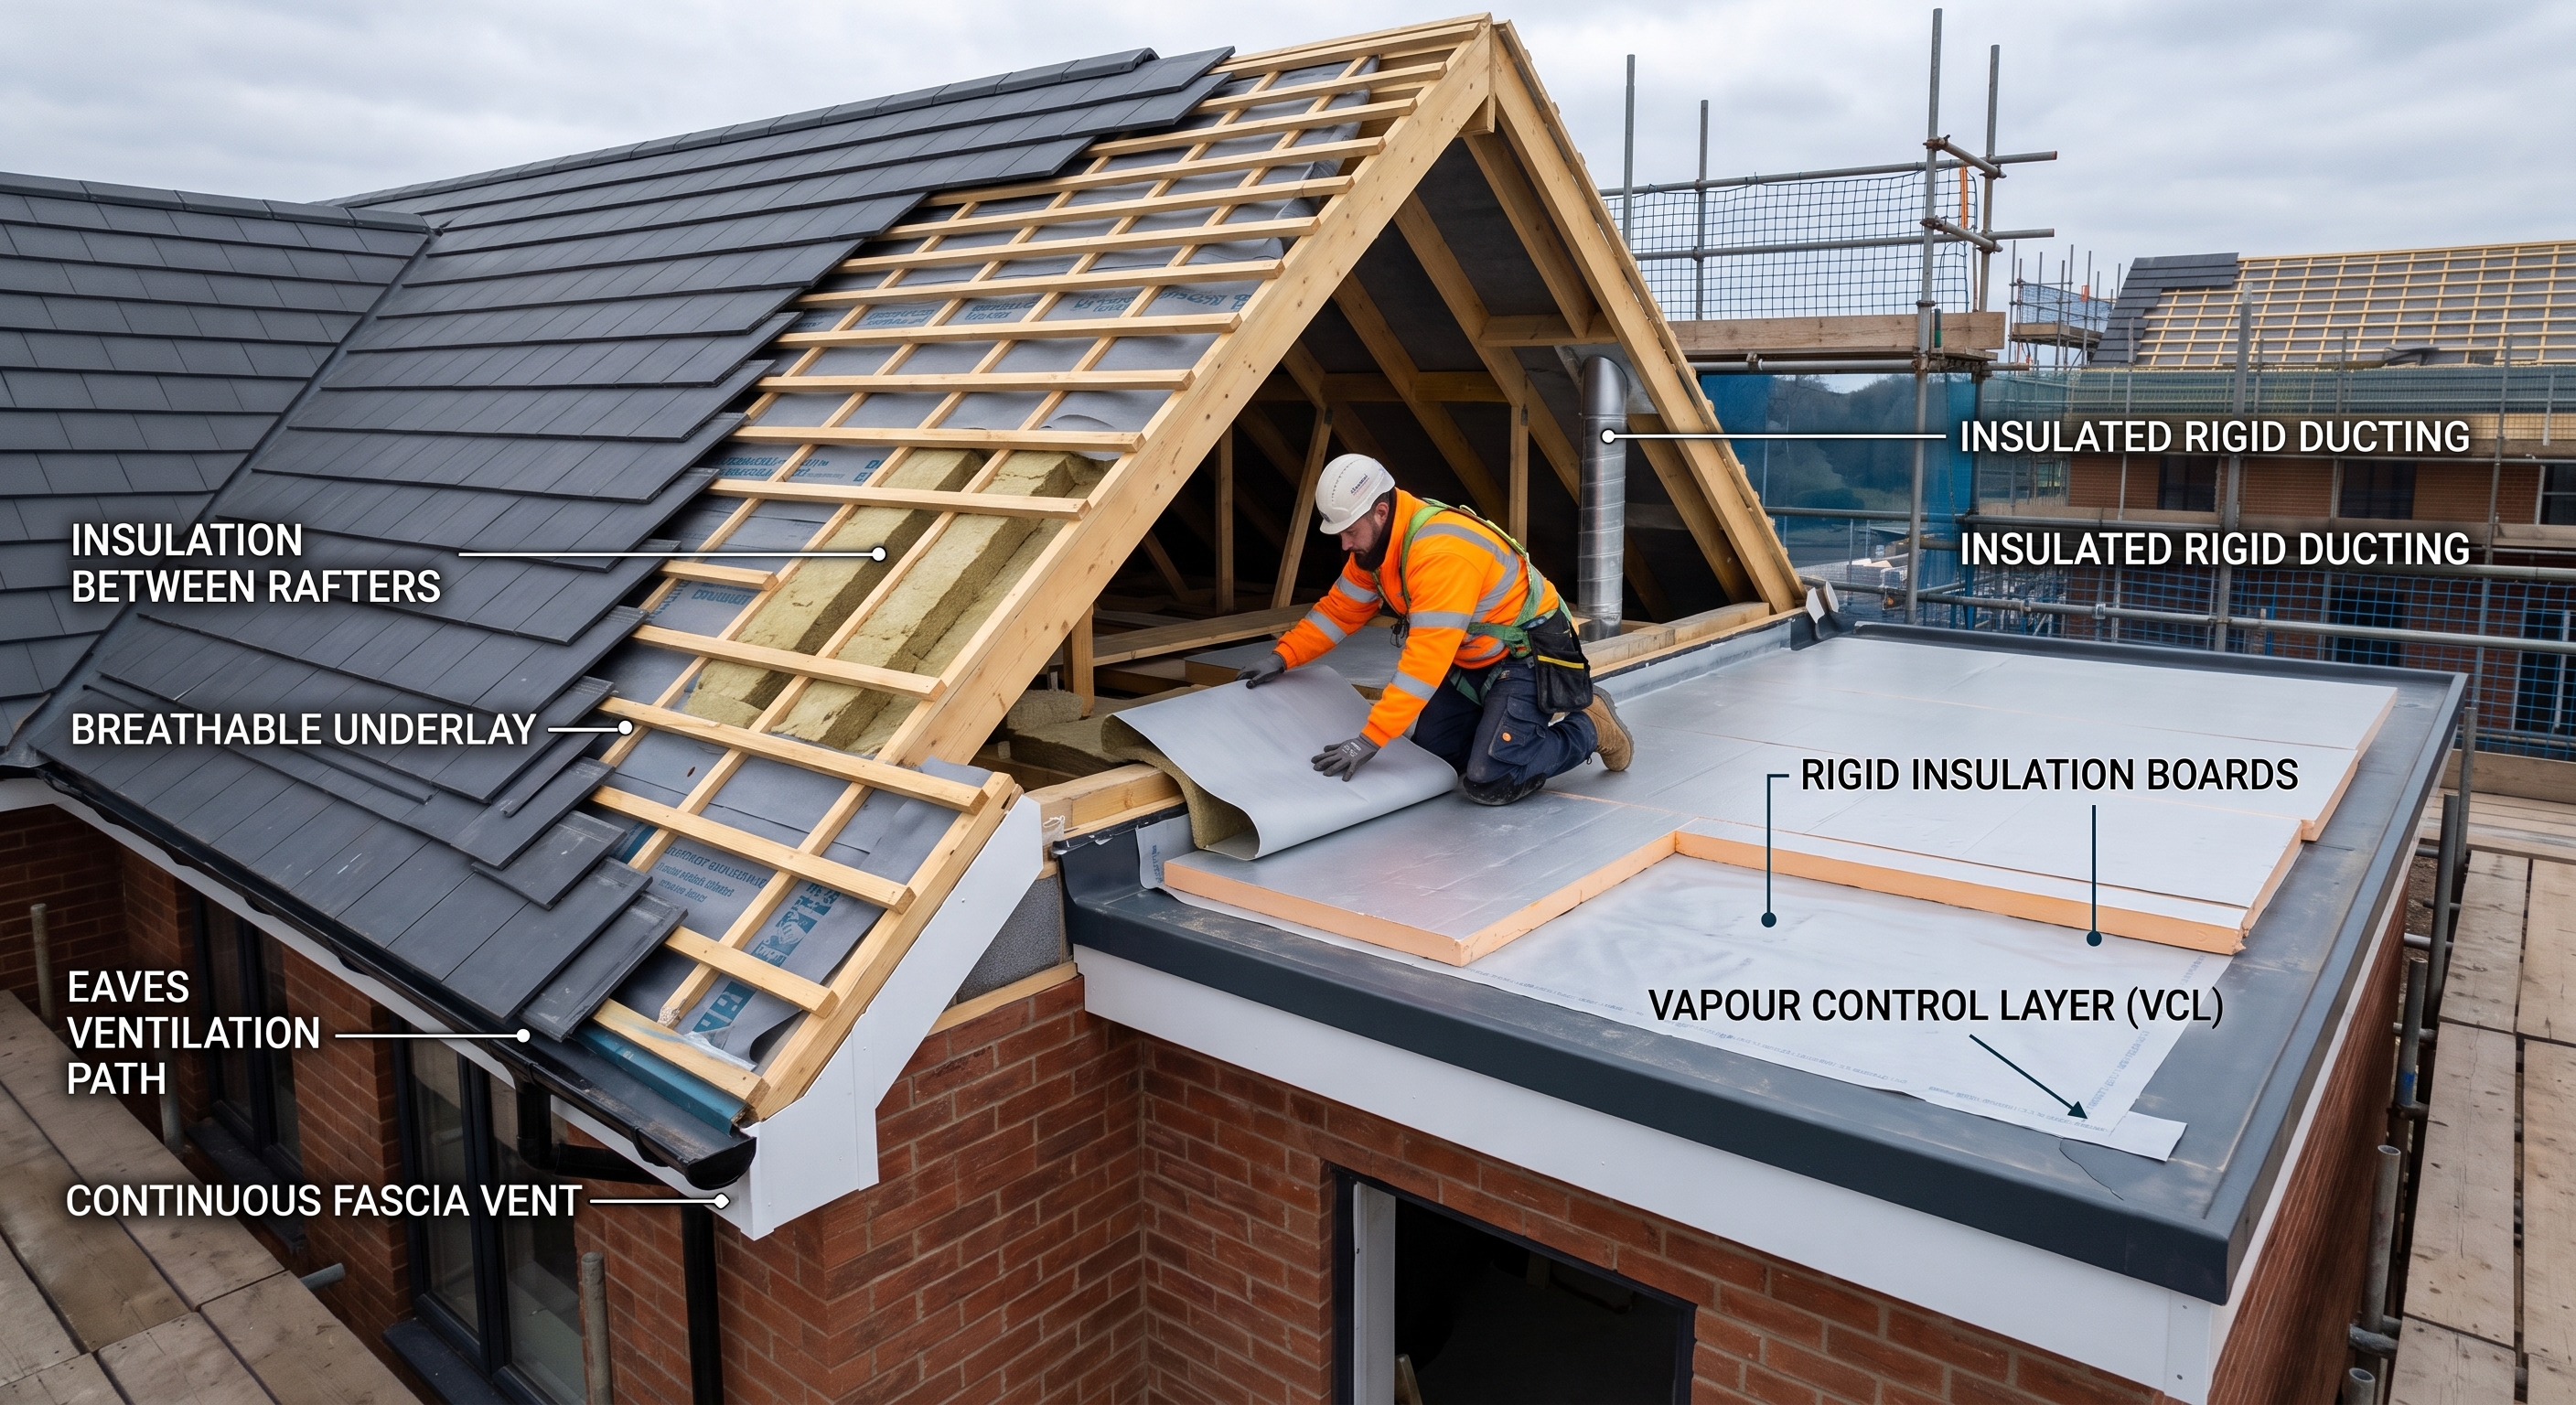
- Shoving Loft Insulation Deep into the Eaves: When rolling out loft quilt, site workers naturally want to tuck insulation right into the low eaves corners so there are no cold spots. But doing that squashes the insulation against the roof felt, blocking the 10mm or 25mm continuous fascia vent. Without fresh air moving across the loft floor, moisture builds up fast. The fix: always clip rigid plastic eaves ventilator trays (rafter roll trays) over the wall plate between the rafters before rolling out insulation.
- Punching Unsealed Holes for Downlights and Loft Hatches: Dryliners put up a tidy vapour control layer, only for electricians to core out 12 unsealed holes for ceiling downlights. Warm, steamy air from showers and cooking gets sucked straight up through those holes into the freezing roof space. This also harms your final residential air leakage testing results. The fix: fit airtight, fire-rated downlight covers sealed directly to the ceiling membrane, and make sure loft access doors are factory-insulated and draft-stripped around the frame.
- Putting the Vapour Barrier on the Wrong Side of Flat Roof Insulation: On warm flat roofs, putting the vapour control layer above the rigid insulation board (rather than underneath it on the structural deck) lets warm indoor air enter the insulation and turn to water beneath the cold outer waterproof membrane. The fix: on a warm deck flat roof, the air and vapour control layer must always be laid directly onto the structural deck below the insulation boards, with all edges lapped and dressed up the parapets.
- Relying on “Breathable” Felt Without Counter-Battens: It is easy to assume that using a modern Type LR breather membrane means roof ventilation can be forgotten entirely. But if tight slates or fibre-cement tiles are nailed straight onto tile battens without an air gap, moisture vapour passing through the membrane gets trapped under the tiles and soaks the timber battens. The fix: in line with BS 5250:2021, fix 25mm counter-battens over the rafters above the breather membrane to create an open drainage and airflow gap beneath the tiling battens.
- Running Uninsulated Extract Ducts Across a Cold Loft: Running standard flexible foil ducting from bathroom extract fans across an unheated loft creates a built-in condensation trap. Warm, moist steam cools down inside the ducting, turns into liquid water, and runs back down into the fan or drips through the ceiling. The fix: use factory-insulated rigid ducting in unheated roof spaces, keep runs straight, and install an in-line condensation trap. Make sure the system is properly checked with ventilation flow rate testing.
What Good Looks Like on Site
When moisture risk is designed out and built properly from day one, site teams benefit from:
- Smooth Building Control Sign-Off: Clear, certified BS 5250 calculation documents ready for the inspector at the first visit.
- Dry, Solid Roof Timbers: No timber rot, no mould staining, and no batten decay over the entire life of the property.
- Full Thermal Performance: Insulation stays completely dry and delivers the exact energy savings calculated in your U-value calculations.
- Joined-Up Building Compliance: Seamless coordination between airtightness, background ventilation testing, and Part L evidence packages.
- No Post-Handover Callbacks: No frustrated new homeowners ringing up about damp patches or peeling paint months down the road.
Turnaround Times, Delays, and What You Receive
- Standard Turnaround: Delivered in 3 to 5 working days once all roof details are received.
- Fast-Track Priority: Delivered in 24 to 48 hours when an urgent site sign-off or inspection is looming.
What Can Hold Things Up? The most common delay is vague material descriptions on drawings—such as writing "150mm insulation" without specifying whether it is foil-faced PIR, phenolic foam, EPS, or mineral wool, or missing the exact brand of breather membrane. Supplying the exact product names upfront keeps everything moving quickly.
Your Complete Deliverable Pack Includes:
- Full BS 5250 & Approved Document C Compliance Certificate: Signed and stamped by an accredited compliance engineer, ready to hand straight to Building Control.
- Layer-by-Layer Temperature & Vapour Curves: Clear charts showing temperature drops and dew point safety margins through every part of the roof.
- Monthly Condensation & Evaporation Data: Tables showing winter moisture accumulation (in g/m2) and proving complete summer dry-out.
- Site Guidance Notes: Practical notes highlighting critical on-site checks, including batten sizes, membrane laps, and vent requirements.
Why House Builders and Contractors Work With ATSPACE
At ATSPACE, compliance is never treated like a tick-box exercise. The technical team spends every working day out on live building sites across England and Wales, so site pressures, trade handovers, and tight programmes are second nature.
Supporting sites since 2008, our team brings over 15 years of hands-on experience helping regional builders, national house builders, and architects get buildings compliant with a 98%+ first-time pass rate. If a detail flags a condensation risk, our team picks up the phone, talks through the issue in plain English, and provides practical, cost-effective adjustments to get your project approved.
You can handle your entire compliance package under one roof by combining condensation calculations with SAP calculations, SBEM calculations, psi values, air leakage on-site design advice, commercial air leakage testing, and sound insulation testing.
Frequently Asked Questions (FAQs)
1. Why do modern roofs have more condensation issues than older roofs?
Older British homes had plenty of natural draughts, allowing warmth to rise freely into the loft and carry moisture out through loose roof tiles. Modern building regulations require thick insulation (often 400mm mineral wool or 150mm+ PIR). This keeps living rooms toasty, but leaves the loft space much colder. When indoor humidity finds its way into a colder loft void, it condenses rapidly unless proper ventilation and airtight ceiling detailing are in place.
2. What is the difference between a U-value calculation and a condensation risk analysis?
A U-value calculation measures the rate of heat loss through a roof (W/m2K). A condensation risk assessment checks how moisture vapour travels through those same layers, proving that water will not condense invisibly inside the timber structure (interstitial condensation) or create surface mould. Both are required for sign-off, but they evaluate two completely different physical checks.
3. Do roofs still need ventilation when using a breathable roofing underlay?
Under BS 5250:2021, installing a breathable membrane (Type LR) does not automatically mean all ventilation can be left out. If the roof has a tight, non-ventilated covering (like fibre-cement slates or metal standing seam), or if the ceiling cannot be proven to be well-sealed, ridge ventilation or a ventilated counter-batten cavity is necessary to stop moisture trapping beneath the tiles.
4. What is the difference between the Glaser method and WUFI dynamic modeling?
The Glaser method (BS EN ISO 13788) is a standard calculation assessing 1D steady-state monthly vapour movement. Dynamic hygrothermal modeling using WUFI (BS EN 15026) is a detailed simulation that accounts for hourly local weather conditions, solar heat on dark tiles, driving rain absorption, and seasonal moisture storage. WUFI is essential for flat roofs, unvented timber cassettes, and internal wall insulation retrofits.
5. How do site teams stop moisture forming in warm flat roofs?
On a warm flat roof, fit a high-performance vapour control layer (such as an aluminium-lined bituminous membrane) fully bonded directly to the structural deck before laying the insulation. Install insulation boards tightly with staggered joints, and dress all perimeter upstands up past the insulation line to stop warm air bypassing the thermal barrier.
6. What counts as a “well-sealed ceiling” under BS 5250?
A well-sealed ceiling means all plasterboard joints are taped and filled, all pipe, wire, and downlight penetrations are sealed airtight with gaskets or mastic, and the loft hatch is draft-stripped and clamped down tight. Getting this right stops warm, moist indoor air from being drawn into the cold loft space.
7. Can wet plaster and screed during construction cause loft condensation?
Yes, absolutely. Plastering and concrete screeding pump hundreds of litres of water into a new house. If windows and trickle vents are kept shut and space heaters are turned on without dehumidifiers, that moisture evaporates, rises into the roof void, and creates heavy temporary condensation. Keeping trickle vents open and using dehumidifiers during the drying-out phase makes a big difference.
8. Does an assessment report guarantee Building Control approval?
No consultant can issue a legal guarantee on behalf of a local authority or approved inspector. However, an ATSPACE condensation risk assessment delivers a fully compliant engineering calculation strictly in line with BS 5250:2021 and BS EN ISO 13788, providing the exact verified evidence required by Building Control officers and warranty providers (such as NHBC, Premier Guarantee, and LABC) to grant formal sign-off.
Keep Your Roofs Dry, Compliant, and Ready for Handover
Don’t let unverified roof specs, insulation substitutions, or moisture headaches slow down your completion dates.
Get in touch with the technical team at ATSPACE today. We will review your roof build-up, run your verified BS 5250 condensation risk assessment, and provide the practical on-site advice you need to build with complete peace of mind.
